OpenCV and Depth Map on StereoPi tutorial
UPD> We have updated version of this article, including C++ code, here:
OpenCV: comparing the speed of C++ and Python code on the Raspberry Pi for stereo vision
Today we’re pleased to share with you a series of Python examples for OpenCV development. This code works with either the StereoPi or the Raspberry Pi Development Board, as both support using two cameras simultaneously. Our ready-to-use code (and also Raspbian image) will help you every step of the way, from the first image capture to the Depth Map created via real-time video capture.
Introduction
We would like to emphasize that all of these examples are for those new to OpenCV and are not intended for production use. If you are an advanced OpenCV user and have worked with the Raspberry Pi before, you’ll know it’s better to use C/C++ (instead of Python) and to utilize the GPU for better performance. At the end of this article we’ll provide some notes regarding the various bottlenecks we experienced using Python.
Hardware setup
Here is our hardware setup:
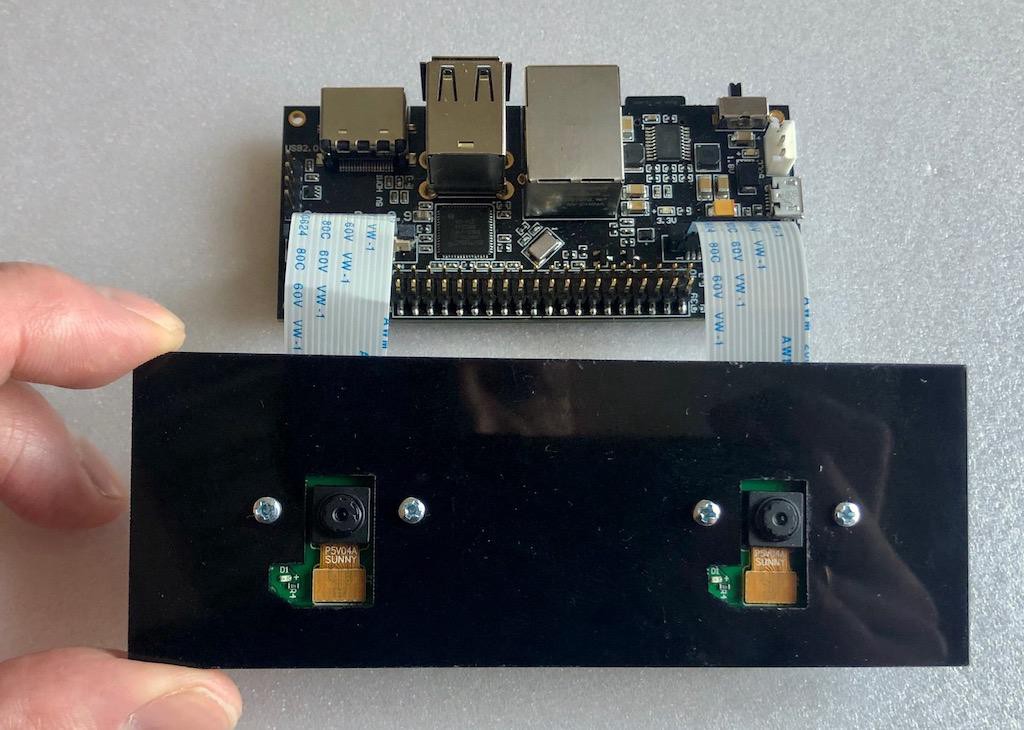
We used the StereoPi board with Raspberry Pi Compute Module 3+. Also two Raspberry Pi cameras V1 connected (based on ov5647 sensor).
Software used:
- Raspbian Stretch (kernel 4.14.98-v7+)
- Python 3.5.3
- OpenCV 3.4.4 (pre-compiled, ‘pip’ from Python Wheels)
- Picamera 1.13
- StereoVision lib 1.0.3 (https://github.com/erget/StereoVision)
The software installation process is beyond the scope of this article but we have prepared a Raspbian image with all software installed. Here is a link to our GitHub stereopi-tutorial repository.
Notice
All scripts support key stroke processing, and you can press ‘Q’ key to stop them. If you use Ctrl+C to stop the script, it may break the Python interaction with the cameras. In this case, you will need to reboot StereoPi.
Step 1: Image Capture
We use 1_test.py script for this purpose.
Open the console and go to our examples folder:cd stereopi-tutorial
Console Command:python 1_test.py
After starting the script you can see a preview window with the stereoscopic video. Pressing ‘Q’ will stop the process and save the last captured image. This image will be used in the next scripts for Depth Map parameters tuning.
This script allows you to check if your hardware is operational and helps you obtain your first stereoscopic picture.
The following video shows how the first script works:
Step 2: Collecting Images For calibration
In an ideal world, a perfect depth map needs to use two identical cameras with their optical, vertical and horizontal axis all in parallel. In the real world, however, cameras are different and it’s impossible to align them perfectly. Thus, a software calibration method is used. Using two cameras you take multiple photos of an object. In our case, we used a printed chessboard. A special algorithm will then analyze these photos and find parameters for correction. This script begins this process by capturing a series of chessboard photos for calibration. Before each photo, the script starts a five (5) second countdown. Five seconds is generally enough time to reposition the chessboard. Make sure it can be seen by both cameras and ensure it’s stable to avoid “blurred” photos. The default number of photos captured per series is 30.
Console Command:python 2_chess_cycle.py
The process:
At the end, we have 30 stereoscopic photos, saved in /scenes folder.
Step 3: Image Separation
The third script 3_pairs_cut.py separates the captured photos into “left” and “right” images and saves them in /pairs folder. These separations could be done on-the-fly, without saving, but this step is helpful for your next experiments. You can save image-pairs from different capture series. Use your own code to work with this images, or use another stereoscopic camera’s images by putting them in this folder.
This script will show you every stereo pair before it’s separated (and waiting for key press). This lets you find bad photos and remove them before the next script.
Console Command:python 3_pairs_cut.py
Short video:
Our code also includes the images we used for calibration. You may save them as an example before taking your own stereoscopic photos.
Step 4: Calibration
The next script 4_calibration.py loads all pairs saved on the previous step and calculates correction matrices. The script first tries to find a chessboard on the photo and, if it can’t, then it ignores the current pair and continues forward. So if you have some bad photos in your series, it won’t break the script. After all the calculations have been done, the program will rectify the last image and show you resulting “fixed” images. At this step, you can understand the quality of the calibration. In our case, calculations took about a minute and a half.
Console Command:python 4_calibration.py
Calibration script doing his job:
Step 5: Depth Map Tuning
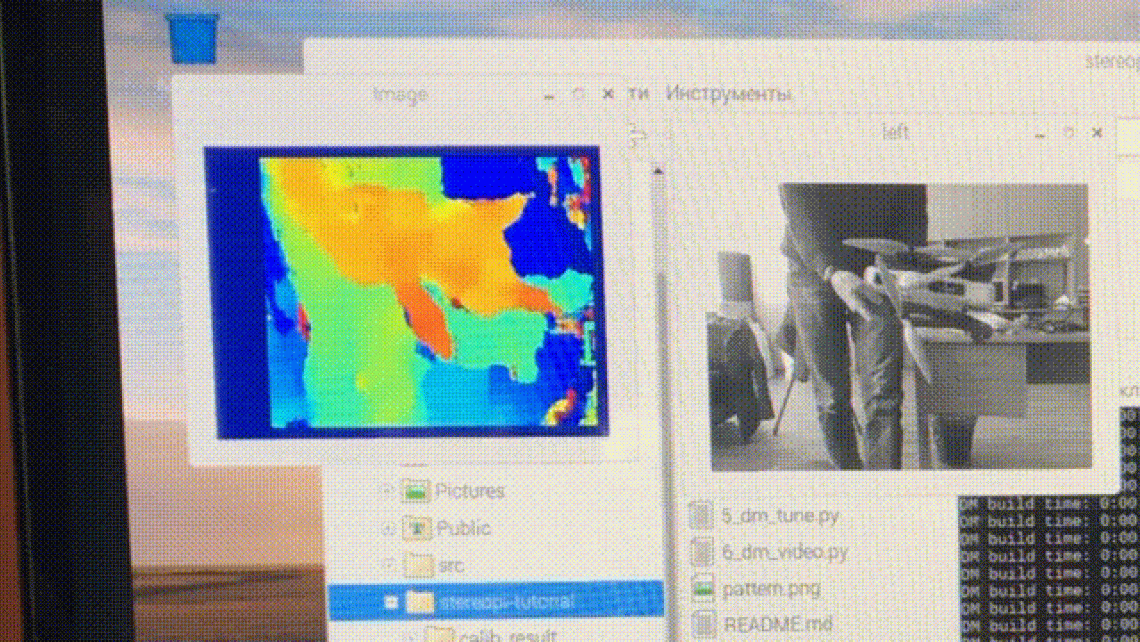
The next script, 5_dm_tune.py, loads image saved in script 1, and the calibration results from step 4. After that it presents you with a depth map and an interface for fine-tuning. If you want to use our parameters, just press the “Load settings” button. Before tuning the parameters, we recommend taking a photo with 3 objects at different distances from camera. For example one close-up at 30–40 cm, another at average distance (2–3 meters) and another “far” away. It will help you to find the right settings, where the closest objects will be red, and those far away will be dark-blue.
Console Command:python 5_dm_tune.py
Here is how this looks like:
Step 6: Real Time Depth Map Using Video
Last script 6_dm_video.py builds depth map in a real time, using results from previous steps.
Console Command:python 6_dm_video.py
The result:
We hope our scripts will help you in your experiments!
Notes for advanced users:
- Once started, the first script will display the average time between captured frames and, once stopped, it will show the average FPS. This can be used as a simple tool to determine the camera and capture parameters at which Python can capture imagery without dropping frames. Using this script, we’ve found that setting the camera to 1280x480 at 20 FPS provided stable results, with no lost frames.
- You may have noticed that we capture images from camera at 1280x480 resolution and then scale it down to 640x240. You may ask, “why don’t we just capture 640x240, and avoid the Python processing to scale them?”
The reason is that PiCamera has some bugs related to capturing images at low resolutions, which results in the image appearing broken (photo mixed with green squares). So, to avoid this, we use a method of acquiring a large image and then scaling it down via the GPU. In this way, there is no additional load to our ARM CPU! - Why do we use BGRA capture, but not BGR?
As we mentioned before, we resize the images using the GPU, and a native GPU format is BGRA (or RGBA, as you wish). If you use BGR you will find two issues; the first is a lower FPS (about 10–20% in our case) and the second is a PiCamera warning «PiCameraAlfaStripping: using alpha-stripping to convert to non-alpha format; you may find equivalent alpha format faster”. Googling this error led us to PiCamera documentation where we found the BGRA method. - Where is PiRGBArray in your code?
This is a native class of PiCamera for working with cameras. In our experiments, using a hand-made Numpy array instead of PiRGBArray gives us about 50% more FPS. We don’t think PiRGBArray is a poor choice and it may be we made some mistakes in implementation. We’ll look into this further at a later time. - What is the CPU load while building the Depth Map with video?
Let me answer this with a screenshot:
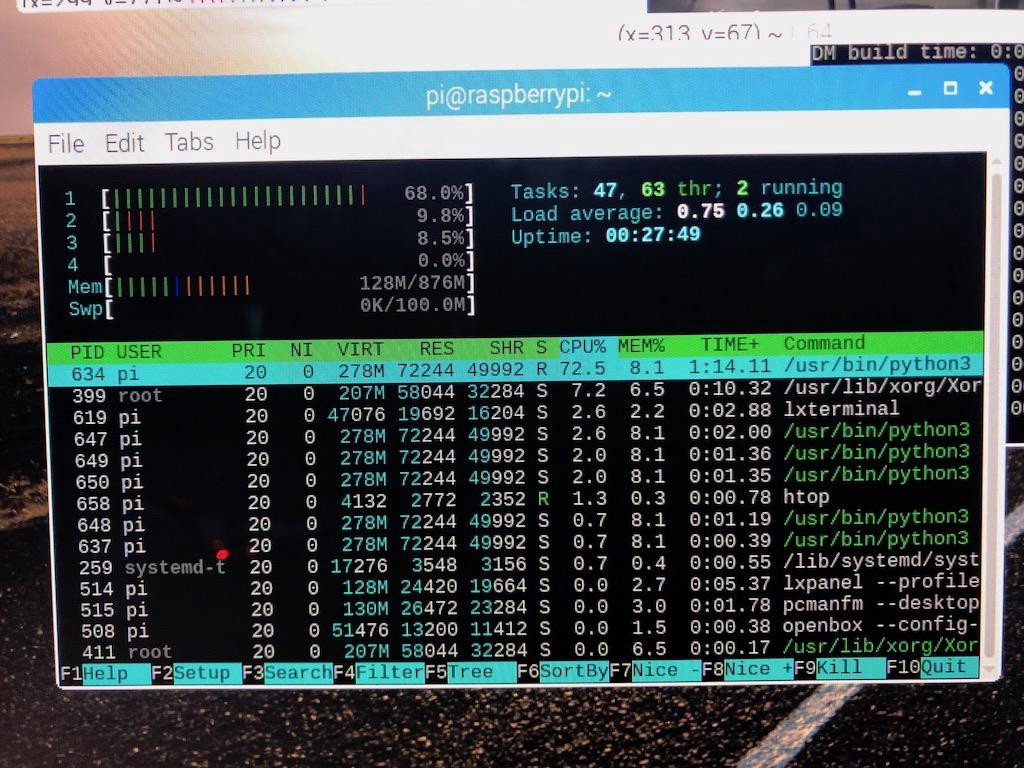
We can see that only 1 kernel from 4 of the Pi’s CPUs has some load — even while rendering the GUI, 2 images and a depth map. This means that there is potential for performance here, and can try to use it by OpenCV optimization (OpenMP) using C instead of Python.
- What is the maximal Depth Map FPS we can have with these settings?
We were able to achieve ~17 FPS, while the camera captures 20 FPS. FPS appears to be most sensitive for a number of parameters. MinDisparity and NumOfDisparities are obvious as these define the number of “steps” for running a window while comparing two images. Another parameter appears to be preFilterCap. - What is the CPU temperature?
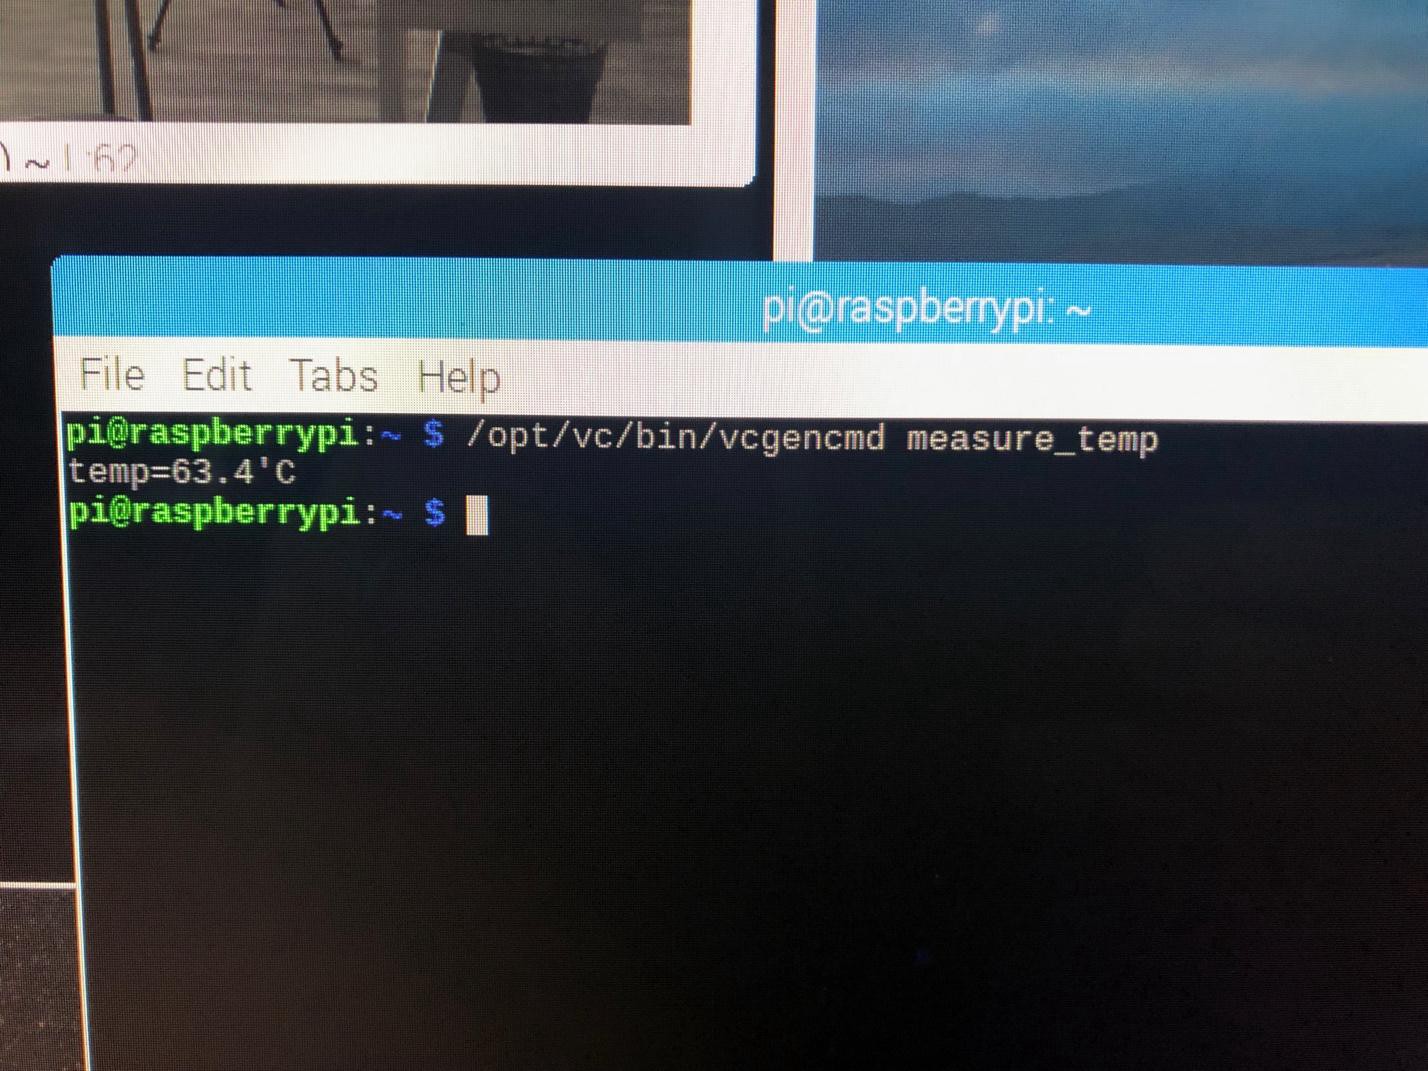
- Using a Compute Module 3+ Lite, we’re seeing a temperature of 63.4’C
- How can we use GPU?
It can be used for undistortion and rectification in a real time. There are some similar approaches, for example using WebGL, or Python-based Pi3d, and also Processing for Raspberry Pi.
There is also an interesting project called py-videocore by Koichi Nakamura. In our communications Koichi told me to use his kernel and StereoBM sources for CUDA to accelerate the depth map. So, there are lot of optimization options.
Thank you for reading!
Here is our source code with the Raspbian image links:
github.com/realizator/stereopi-tutorial